I have been having great fun building up a system to transmit and receive amateur digital television (DATV) signals over the QO100 satellite. Doesn’t need a lot of real estate for antennas which suits my new QTH but it does require experimentation and home construction.
Luckily for me I can take advantage of the pioneering work of many others who have developed hardware and software to support amateur television and DATV over many years.
The go to resource to learn more about this mode is undoubtedly the British Amateur Television Club which has a worldwide membership https://batc.org.uk/
On this page I have noted down my approach to satellite DATV. I am hardly an expert, and things change all the time, so your station may develop differently. However I hope you realise its not too tricky to get on air, and I certainly look forward to working you when you do!
Receiving Amateur TV signals from QO-100
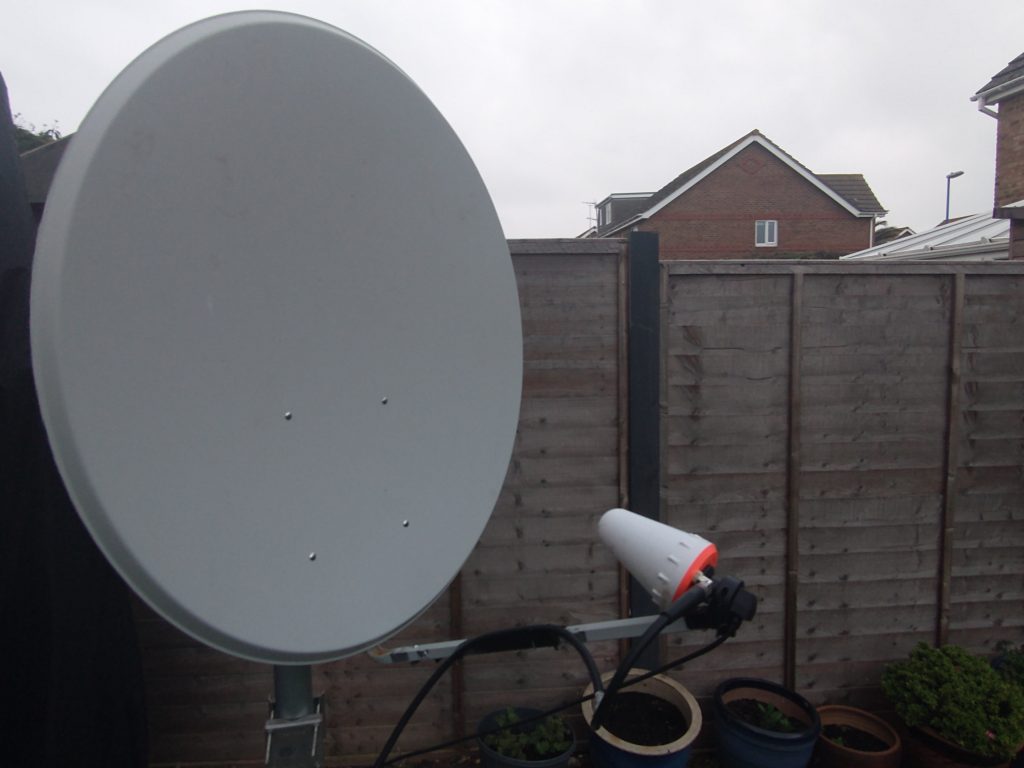
Dish antenna and LNB
I use a 1.1m dish and a Bullseye LNB. You probably don’t want to go much smaller than this. Many DATV stations have 1.2m dishes and some are lucky enough to have ones that are bigger still.
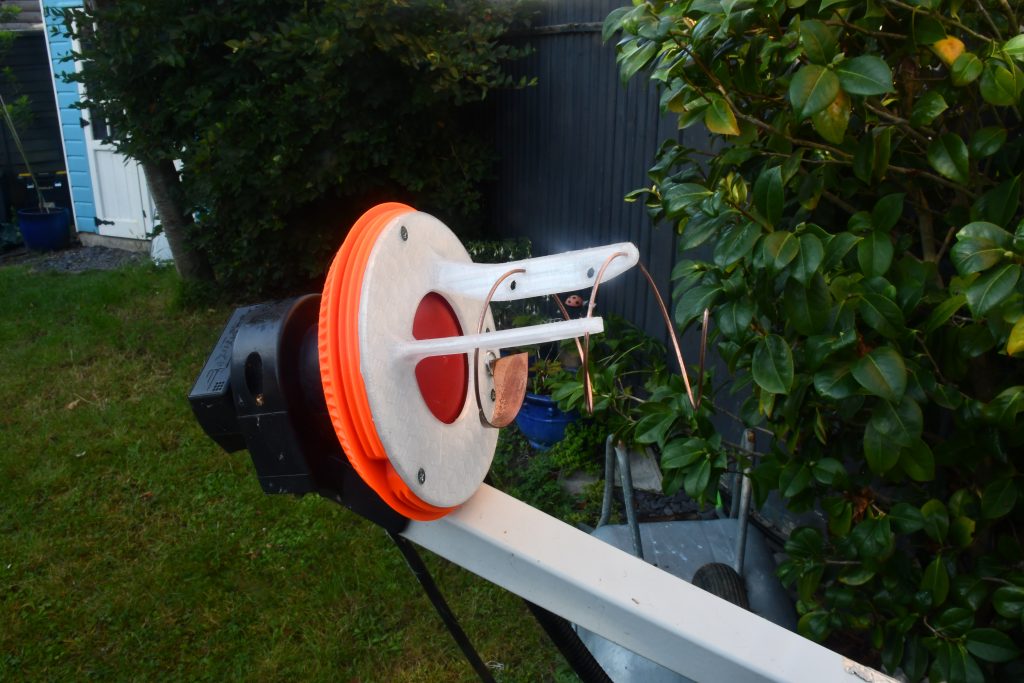
In the picture below a 2.5turn Ice Cone Helix transmit antenna is shown mounted on the LNB which I think is a neat solution.
I also use this receive setup for the narrow band transponder and I have a switch to enable me to either connect the coaxial output from the LNB to either the PlutoSDR used for narrowband or to the DATV ‘Minitiouner’ receiver.
When connected for the wideband transponder the LNB receives an 18V dc feed on the co-ax which sets the receive polarisation to horizontal.
The receive set up is a bit weak. The helix antenna and radome can drop the received signal down by a further 1.5dB. Without the transmit antenna, and with a clear transponder, I receive the wideband beacon with an MER of 9dB. With the transmit antenna in place this drops to about 7.5dB
The Minitiouner hardware
Since around 2017/8 one version or other of the F6DZP Minitiouner receiver hardware has been the most common DATV receiving arrangement. It is based around the Serit 4334 tuner module which has been found to tune down well below the frequencies normally used on satellite and cable tv systems and also been found to work with the type of low symbol rates used by amateur tv transmissions. Both useful characteristics, but quite rare.
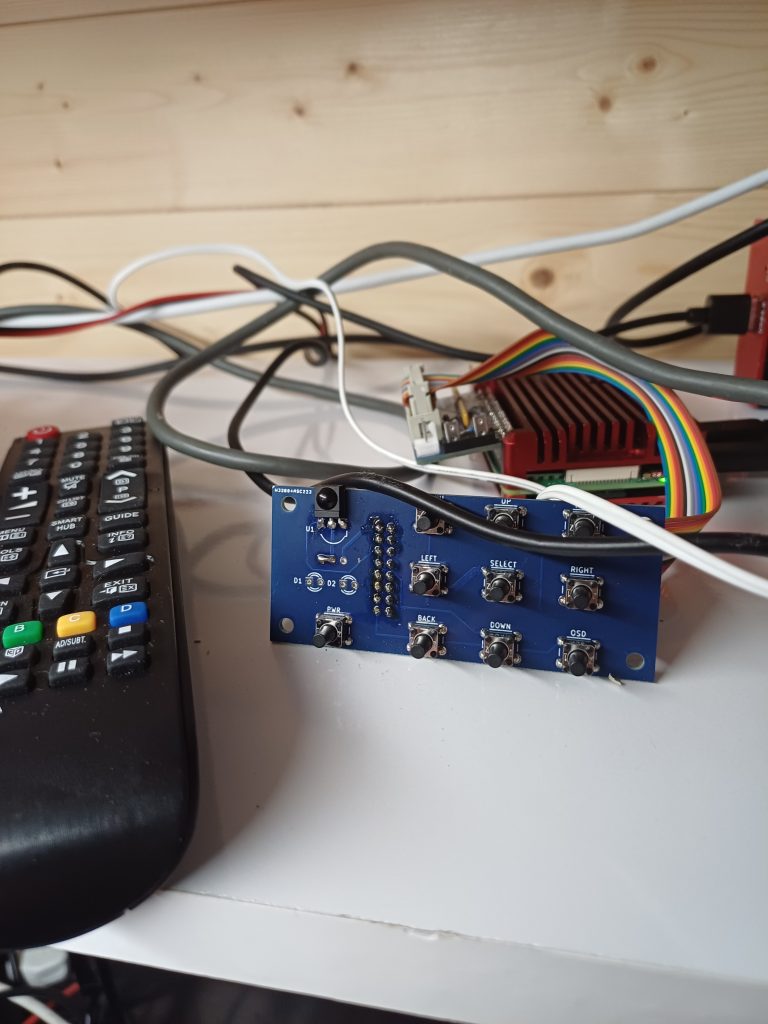
The tuner module is now hard to get hold of, prompting me to put mine in a nice box.
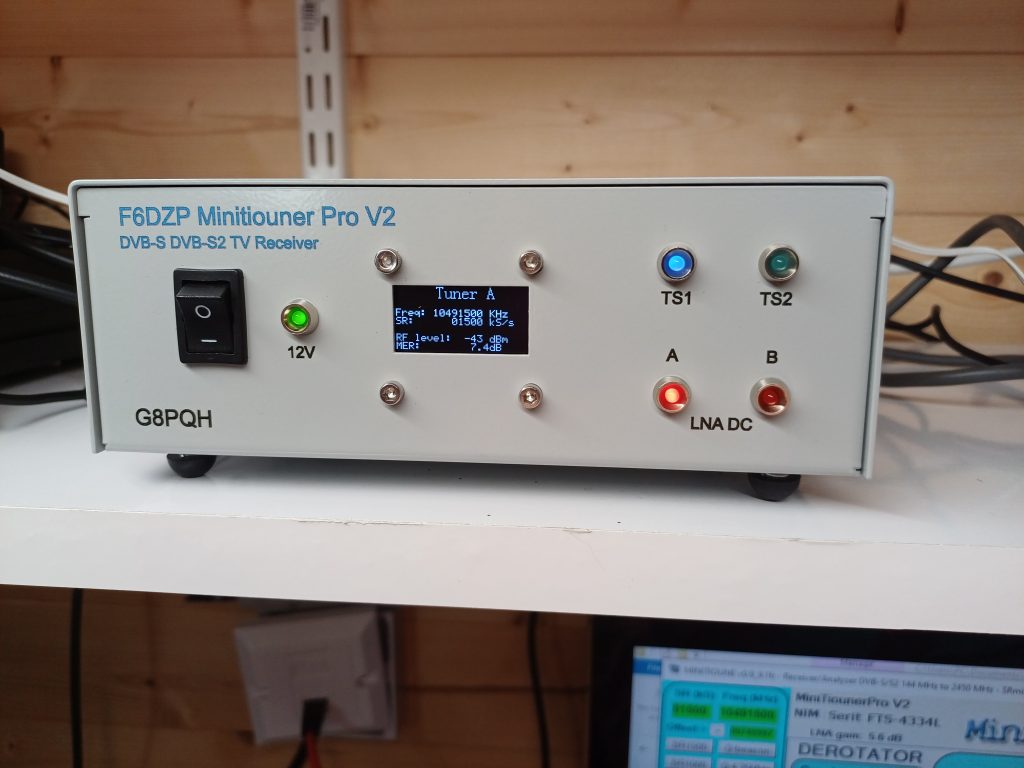
Versions of the hardware have been available from the British Amateur Television Club (BATC) and also the REF in France. I bought my example, a Minitiouner Pro V2 second hand just as a populated pcb and tuner module. I think it would have been supplied by the REF in France originally.
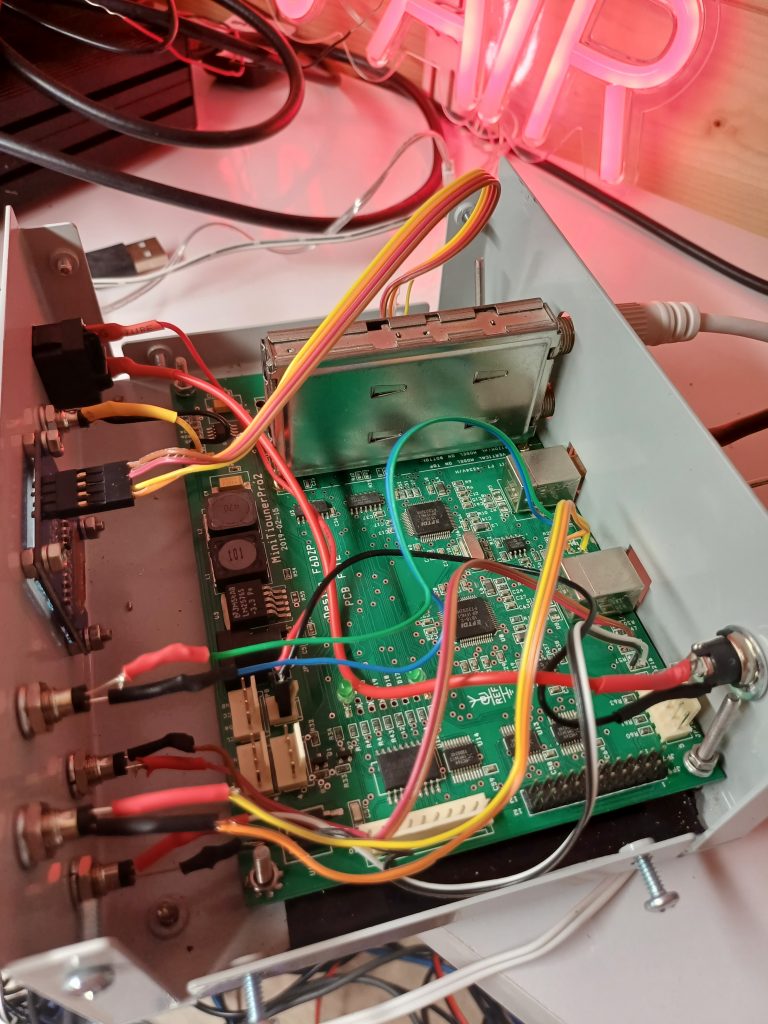
The main PCB of the Pro V2 version has the tuner mounted vertically. It has two inputs A and B. I just use input A connected to the output of the LNB and set the unit to put 18V on this output. Input B could be used for a terrestrial input for example at 1.2GHz. The tuner can receive two signals simultaneously which it outputs as video transport streams on two USB sockets visible at the rear of the unit.
Receive Software for DATV – F6DZP Minitiouner Software
The most common receive software is probably that developed by F6DZP who also developed the receiver. This is the download link you need to register on the site first. http://www.vivadatv.org/viewtopic.php?f=60&t=818
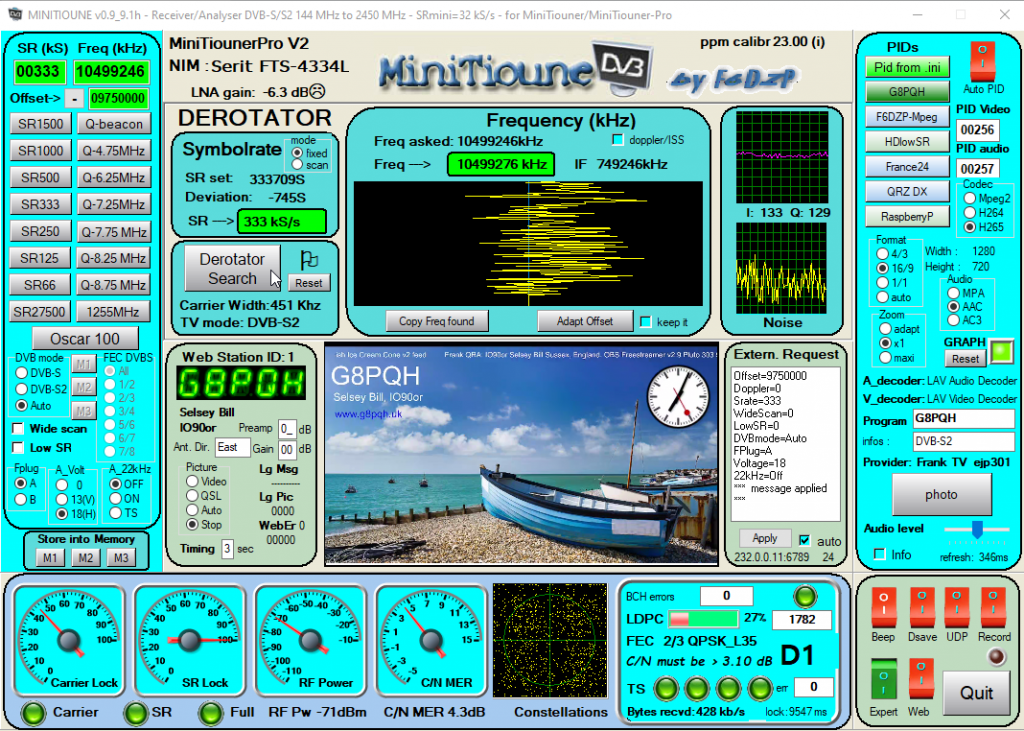
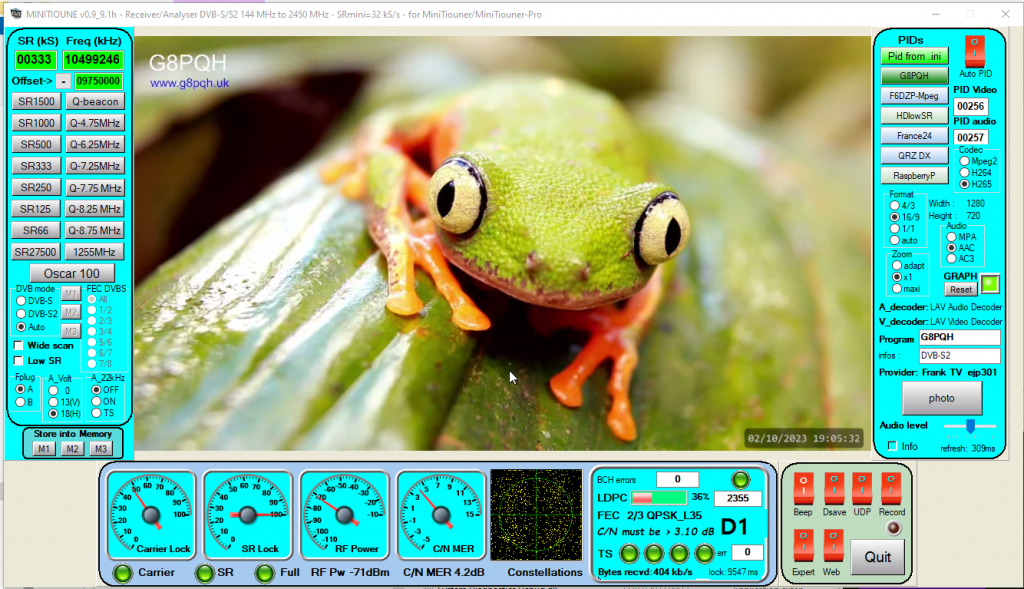
I have used this software initially, it has a constellation display and provides comprehensive information about the received signal. Very useful for looking at your own signal.
 |
 |
Receive Software for DATV -BATC Ryde Receiver
I have made most use of the BATC “Ryde” receiver software, rather than use F6DZP’s own software.
The Ryde receiver is a DVB-S/S2 and DVB-T digital television and Stream receiver based on the Raspberry Pi 4. The core of the system (known as Longmynd) was written by Heather M0HMO and the control software was written by Tim MW0RUD. Significant contributions have also been made by Phil M0DNY and Dave G8GKQ.
https://wiki.batc.org.uk/Ryde_Receiver
The project uses a Raspberry Pi 4, an HDMI Display, an IR Remote Control and requires the MiniTiouner hardware.
I like it because I can offload the reception to a raspberry pi and an HDMI display connected to this device. This leaves the main shack PC (which is only a fanless mini-PC with a single display) to generate and process the transmitted signal and control the Pluto SDR used for transmit.
In concept the Ryde is designed to emulate a consumer set top box and be controlled with a remote control.
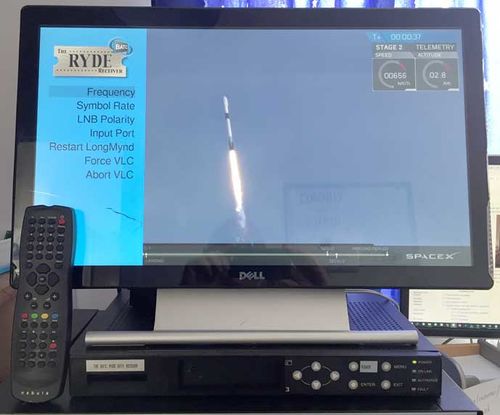
This is how its meant to look, mounted in an old set top box case (source BATC). I am afraid to say the Pi, with add on board is currently untidily sitting on a shelf. I must box it all up!
Receiver Software for DATV – ZR6TG OpenTuner software
The third receiver option that I have played around with is OpenTuner developed by Tom ZR6TG. I really like this. Like the Ryde it uses VLC to display the decoded video and also uses a version of Heather’s Longmynd software to decode the transport stream from the Minitiouner hardware.
http://www.zr6tg.co.za/open-tuner
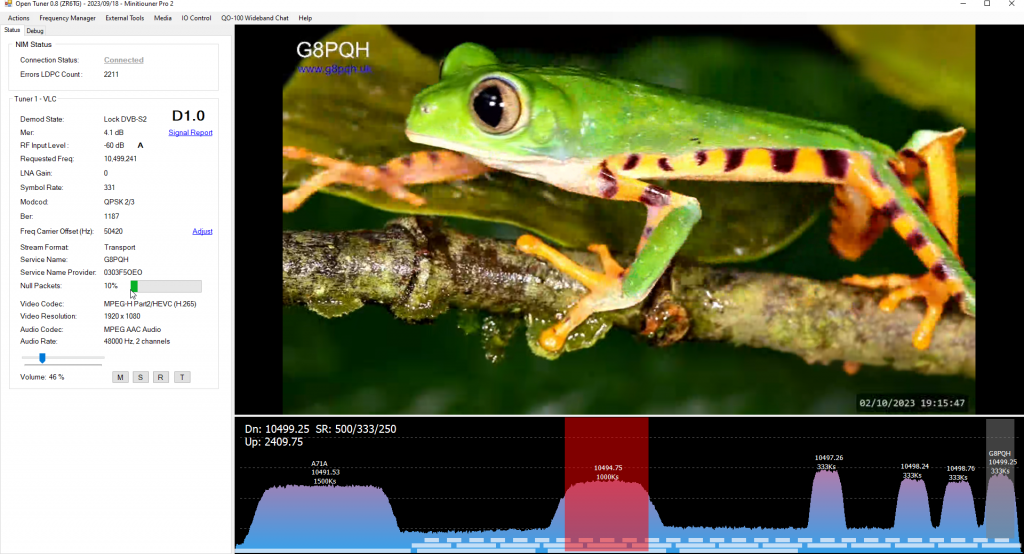
Its a Windows program so I have to run it on the shack PC. Its not as cluttered user interface as the F6DZP software but gives you more information on the received signal than the Ryde does. The spectrum display at the bottom allows you to select the signal you want to watch which is very handy.
OpenTuner is able to recognise both outputs from my Minitiouner Pro V2 and allows me to monitor two signals at once. Well most of the time this seems to work, and its currently the only receive software that supports this.
My Transmit Setup – Pluto SDR Firmware
The same Pluto SDR that is used for narrowband duplex transmit/receive can be used for wideband DATV transmit (but not DATV receive). See My QO-100 station
You can replace the standard Analog Devices Pluto SDR firmware with a new version developed by Evariste F5OEO
I am using the PlutoDVB perseverance firmware 0303 https://www.f5uii.net/en/patch-plutodvb/
But there are newer versions and patches to be applied depending on the Pluto hardware version.
Once installed I find it easiest to communicate with the Pluto over ethernet. The web page generated by the firmware allows you to both control the tv transmission parameters and see an analysis of your transmitted signal.
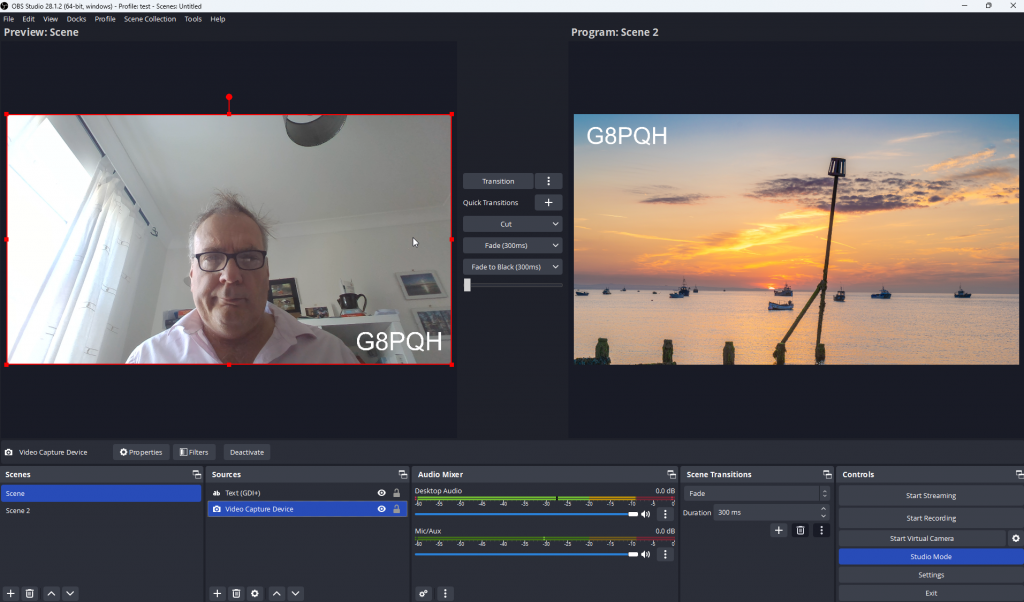
Generating a Digital Video stream – OBS
OBS (Open Broadcaster Software) can be used to stream video data to your Pluto and supports connections to Cameras, USB Webcams, and the playback of video files
- Install and launch OBS on your computer.
- Set up your video sources. OBS allows multiple sources, including cameras, screen captures, pre-recorded videos, and graphics.
- Use OBS’s scene composition features to arrange your video and graphics as desired.
H.265 Format Video
On my shack PC I was able to use it to send H264 coded video to the Pluto using the methodology set out here by F5UII. https://www.f5uii.net/en/transmit-datv-over-qo100-with-sdr-adalm-pluto-f5oeo-plutodvb/
This utilises an RTMP server included in the Pluto firmware and OBS can be set to stream the output video over the network to the Pluto using the the RTMP protocol.
- In the OBS settings, go to the “Output” section.
- Set the output mode to “Advanced”.
- Under “Streaming”, set the encoder to a suitable format for DATV, typically x264 for H.264 video encoding.
- Adjust the video bitrate, keyframe interval, and other settings as required for your desired DATV format and bandwidth.
My shack PC has modest video capabilities and with OBS only H264 video coding is possible. The newer H265 standard gives noticeably better quality on the reduced bandwidth DATV signals typically used. I experimented with an ebay purchase of an H265 HDMI encoder box. This did work to a certain extent, but it didn’t allow me to include a callsign with the transmitted signal. I also tended to suffer with “freezing” and reports of a transmission with no “null packets”.
What I found did work for me was installing a “virtual camera” plugin in OBS and then using the “FreeStreamCoder” software utility by Dominique, F1EJP
http://www.vivadatv.org/viewtopic.php?f=78&t=943
This is provides a small user interface to set up FFMPEG behind the scenes to code your video in H265, in my case making use of the Intel video hardware in the shack PC. (If I had NVIDIA video hardware it would probably work even better)
Dominique provides an English and a French manual for the software that is very clear. I am currently using version 2.9.
This software is a relative of Dominique’s “DATV Easy” software. This software includes the same functionality for coding the video and also controls the Pluto transmit parameters such as frequency and symbol rate. I am still doing things the long way by controlling the pluto DATV firmware independently through its web interface!
DATV Easy can be found here http://www.vivadatv.org/viewtopic.php?f=78&t=1004
My Transmit Setup – Generating a strong enough signal
The Pluto SDR unit is connected the home local area network using an Ethernet to USB OTG adaptor. It receives the transport stream and generates to the DVB-S2 tv signal. However the output power at 2400MHz is very low, about -7dBm so it needs to be amplified to stand any chance of reaching the satellite some 36000km distant.
I have mounted the Pluto and associated amplifiers in a box behind my dish antenna. A diagram below shows the way I have connected everything.
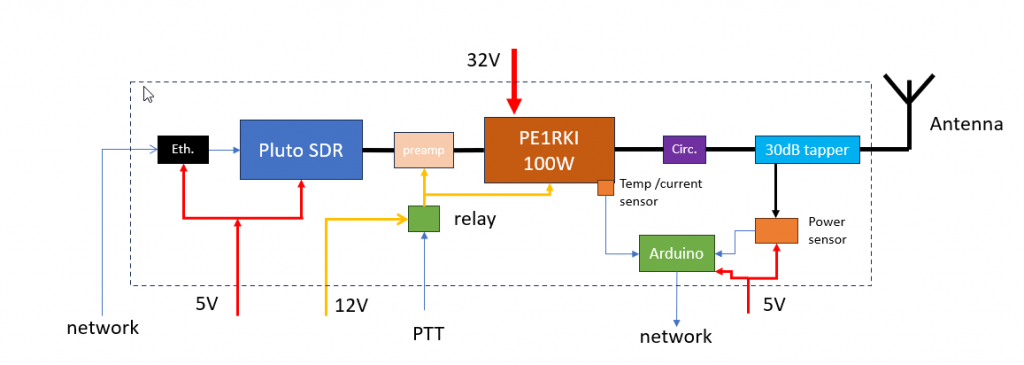
After the Pluto I have used a preamplifier unit designed by Vincent F1OPA which I bought from the French supplier Passion Radio. https://www.passion-radio.com/sat-accessory/amplifier-opa-938.html.
This unit has about 30dB of gain and can output +20dBm (100mW). It has a nice feature in that it contains a SAW bandpass filter on the output to reduce harmonics.
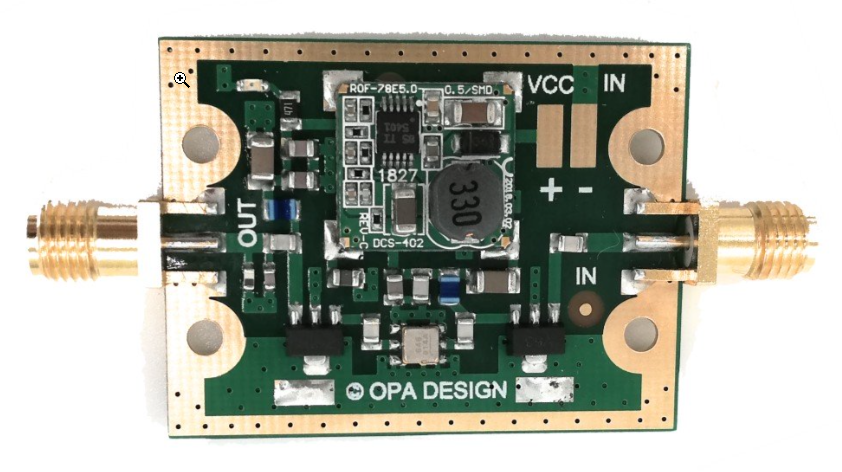
There are a number of other choices the Analog Devices CN0417 amplifier is often used with the Pluto and has a similar output and cost but its gain is less, only 20dB.
I have followed the preamplifier with a an external bandpass filter for 2400MHz.
The preamp is powered from 12V and I apply this 12V using a 5V relay board and a PTT line to ground. When the PTT line is grounded the 12V is applied to the preamplifier, the cooling fan and the bias input for the main power amplifier.
The main PA is a unit built by Bert PE1RKI. A thing of beauty indeed and quite efficient. At 100W output it draws around 8A at 30V.
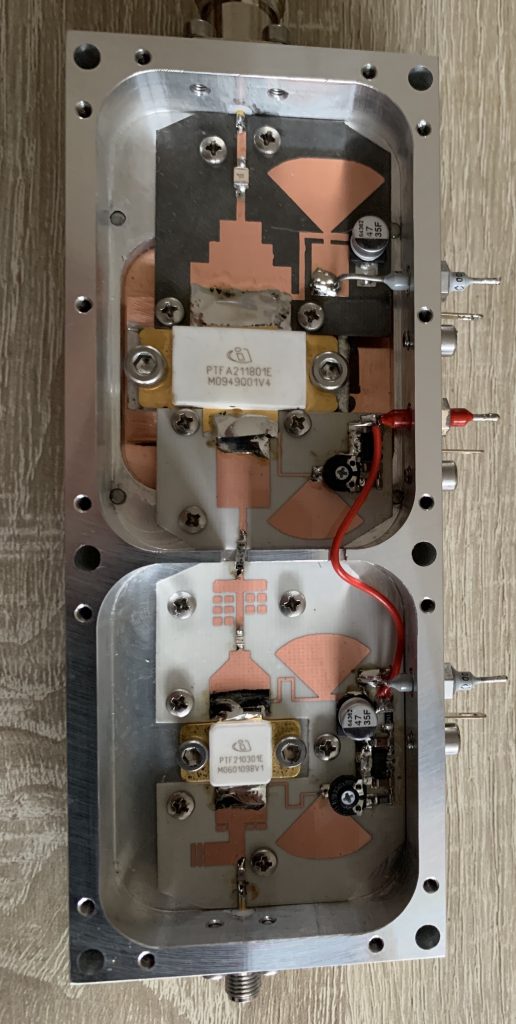
This is a picture of the unit after I replaced the two transistors. They will be destroyed if they are overdriven (ask me how I know!)
A lot of people are using surplus amplifier units from cellular base stations to good effect, although they seem to need a bigger power supply.
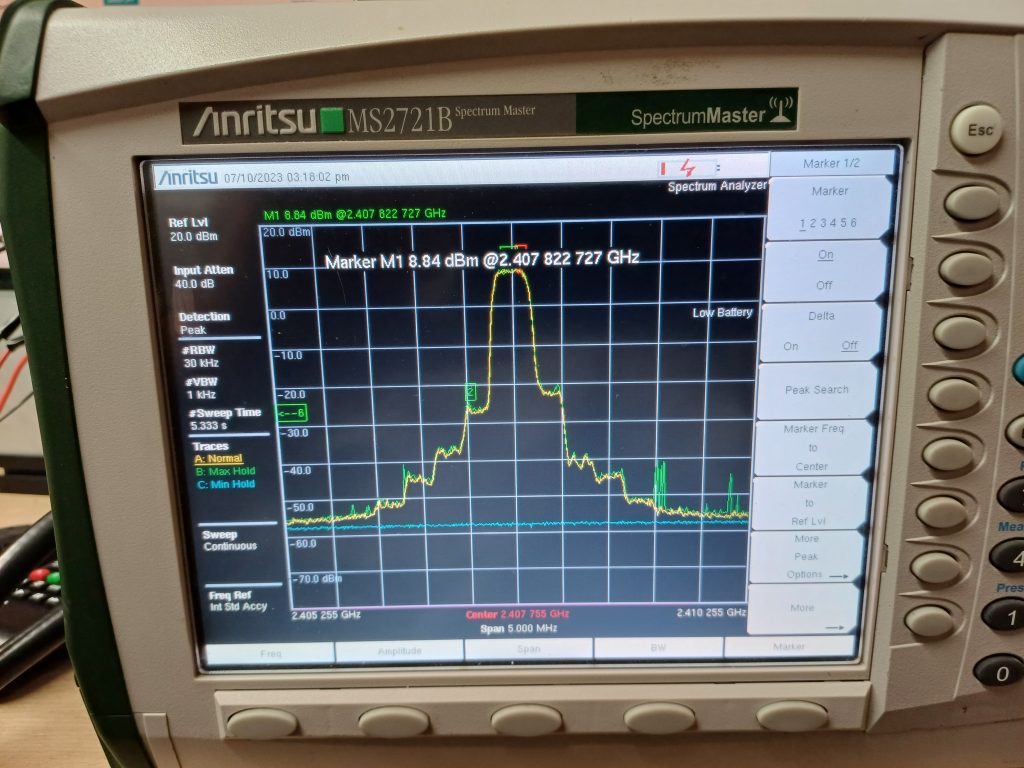
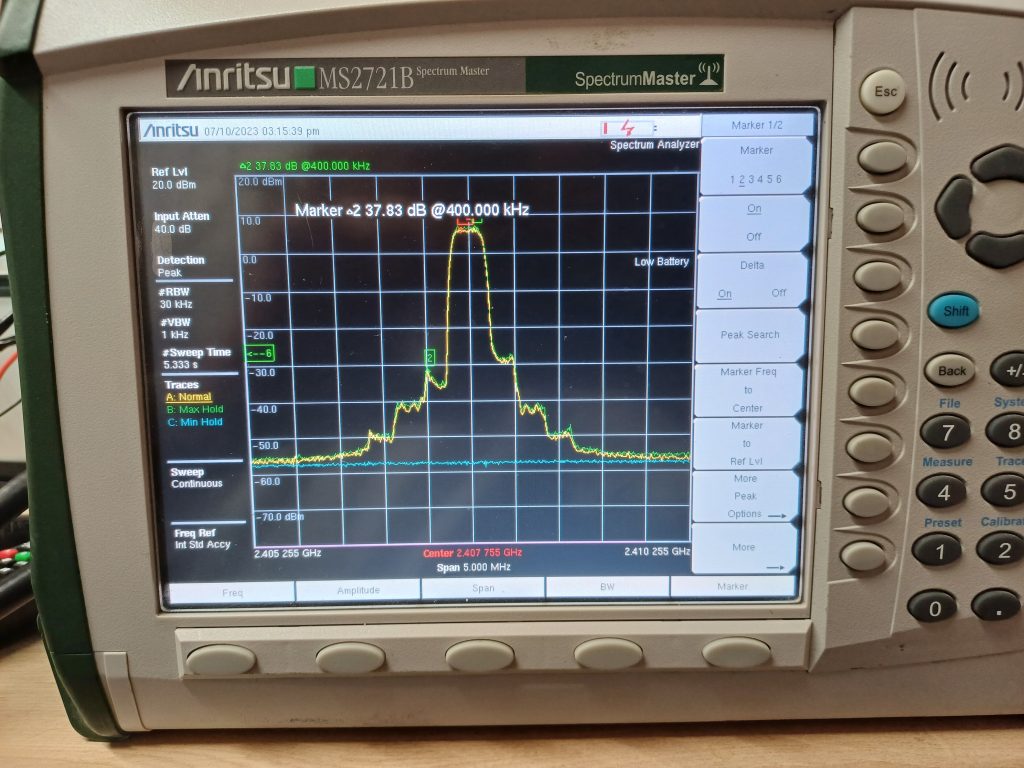
I have a circulator on the output to protect it and this is followed by a 30dB tapper or splitter used to feed a fraction of the signal to a power measurement sensor.
At full power I measured the “shoulders” of a 333kS signal 37dB down on the peak. I am quite pleased with this, and think this is more than good enough to avoid any “undue interference”.
 |
 |
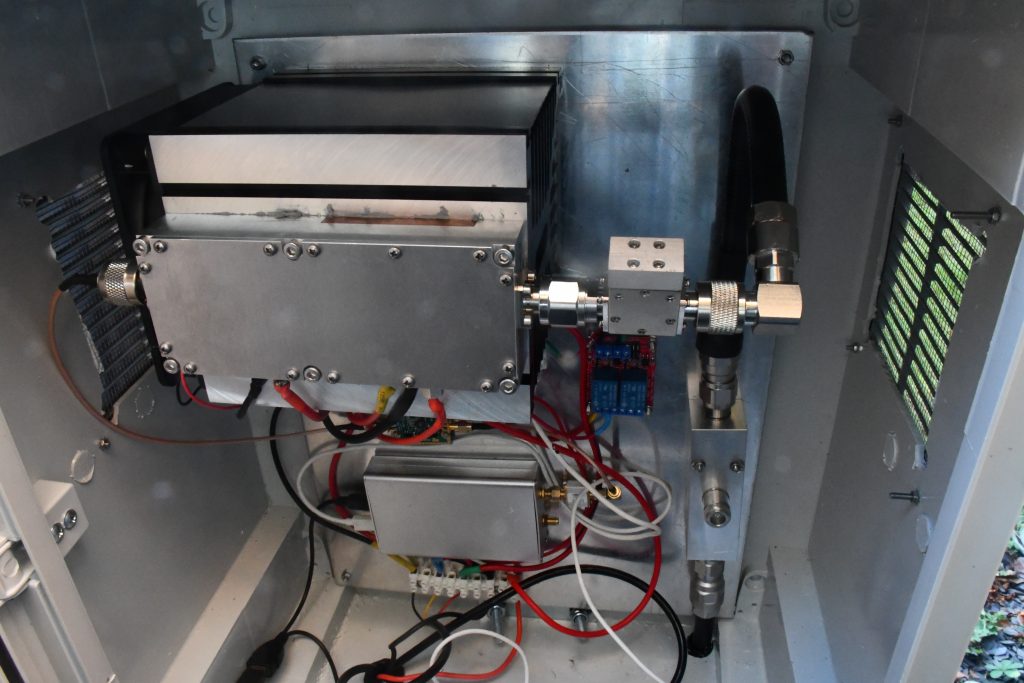
The transmit assembly is mounted in an external box mounted behind this dish as shown in the photograph below. The PA unit is mounted on a large heatsink with a fan on the left hand side. The output is on the right hand side of the PA with the circulator connected directly to the PA output, with a short Heliax connection to the 30dB tapper. In the photo the output to the power sensor is shown not connected. The connection to the antenna exits at the bottom right.
The Pluto unit is mounted in a metal box with the filter on the output and the preamplifier just visible above it.
Helical Transmit Antenna
I am currently using a 2.5 turn Ice Cream Cone antenna for transmit.